Intermediate | Flow of the week: Create PDF Invoices Using Word Templates with Microsoft Flow
This post is written by community member John MacDougall
John is a Microsoft MVP and freelance consultant and trainer for hire specializing in Excel, Power BI, Flow, PowerApps and SharePoint. You can find more interesting articles from John on his blog or YouTube channel.
In this post he is going to show you how you can use the new Word connectors in Flow to easily create some really nice looking PDF invoices.
For this example,he will be using a SharePoint list and the Flow button trigger, but many other triggers could be used including from PowerApps.
Please enjoy!
Video Tutorial
Creating A Word Template
First, you’re going to need to create a Word document template for your invoices.
I’m not a Microsoft Word expert and there might be better ways to create an invoice template, but I find using tables to be an easy option.
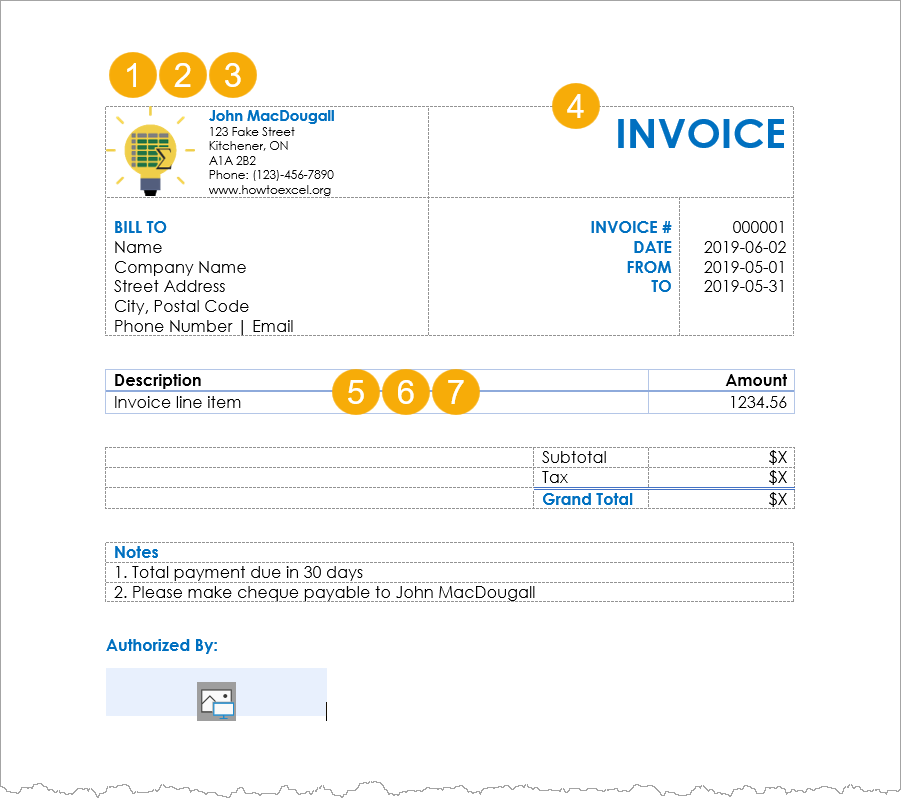
A couple tips for creating your own template:
- Use tables to layout the heading or other sections in the invoice. Go to the Insert tab ➜ Table.
- Remove the borders in your heading table section. Select the table ➜ go to the contextual Table Design tab ➜ Borders ➜ No Borders.
- Add gridlines to your table so you can see and adjust the table borders in your template. Select the table ➜ go to the contextual Layout tab ➜ View Gridlines.
- Use merge or split cells to adjust the layout for sections that need more space. Select the cells you want to merge or split ➜ go to the contextual Layout tab ➜ Merge Cells or Split Cells.
- For the section that will contain the invoice line items, create a table with two rows. One for the column headings and one for the first row of data. You will turn the row of data into a repeating content later.
- Use the table styles feature to add some style to your table. Select the table ➜ go to the contextual Table Design tab ➜ select a style from the Table Styles
- If you’re going to have a lot of line items in each invoice, then you might want the column headings to appear on each page of the invoice. Select the row of column headings ➜ go to the contextual Layout tab ➜ Repeat Header Rows.
You should be able to create a pretty awesome looking template with these tips.
Enable The Developer Tab In Word
Unfortunately, the content controls needed to create templates useable by Flow are hidden away in the Developer tab.
These aren’t available in Word Online, so you’ll need to be using Word on Desktop.
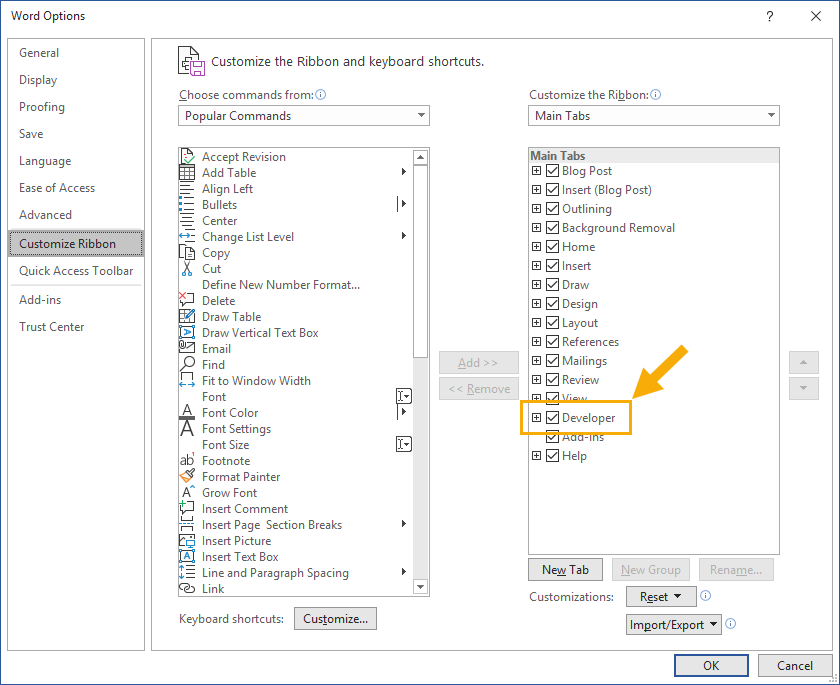
To enable the Developer tab right click anywhere in the Word ribbon ➜ select Customize the Ribbon ➜ check the Developer tab ➜ press OK.
Add Content Controls To Your Invoice Word Template
Now you’re going to need to add content controls to your Word template. These are what Flow is going to use to dynamically populate the Word template.
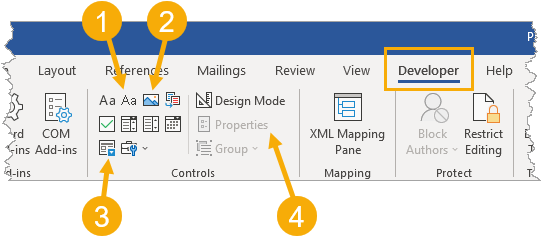
All the content controls can be found in the Controls section of the Developer tab. This example will use 3 types of content controls.
- Plain Text Content Control for input of a single text value. This will be used with the invoice number and invoice line items.
- Image Content Control for input of an image. This will be used with an image of a signature stored in OneDrive, but it could also come from the pen input in PowerApps.
- Repeating Section Content Control for input of variable amounts of data. This will be used with the invoice line items.
- Properties for the selected content control in your Word document. This will be used to name your content controls.
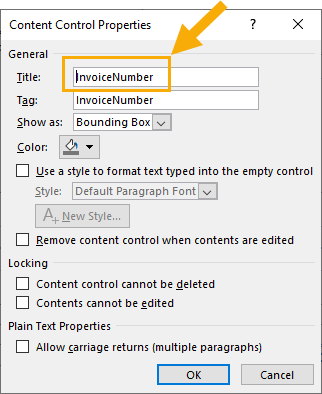
The Properties is how you can name each of the content controls and the name you give the control will be used in Flow.
Add Content Control For The Invoice Number
Highlight the invoice number in your template and click on the Plain Text Content Control in the Developer tab.
Open the content control Properties and give it a name like InvoiceNumber.
Add Repeating Content Control For The Invoice Line Items
Highlight the entire data row in the invoice template and click on the Repeating Section Content Control in the Developer tab.
Open the Properties and give it a name like InvoiceItems.
Once the repeating section has been added, you’ll also need to add a plain text content controls inside the repeating section for each column. This example has two columns which will be named ItemDescription and ItemAmount.
Add Content Control For The Signature Image
Place your cursor in the location in the Word document where you want your signature image to appear and click on the Image Content Control in the Developer tab.
Open the Properties and give it a name like InvoiceSignature.
Note: You will need to adjust the size of the content control so that it fits your image, otherwise your image will appear stretched. Select the control and go to the Picture Format tab and adjust the Height and Width as needed.
You can add a placeholder image first that will be the same size as your signature image and convert this to a content control. The content control will be perfectly sized this way!
Save Your Word Template To OneDrive Or SharePoint
Once you’re satisfied with your Word template, you’ll need to save it to either OneDrive or SharePoint.
Building Your Flow To Create Invoice PDF’s
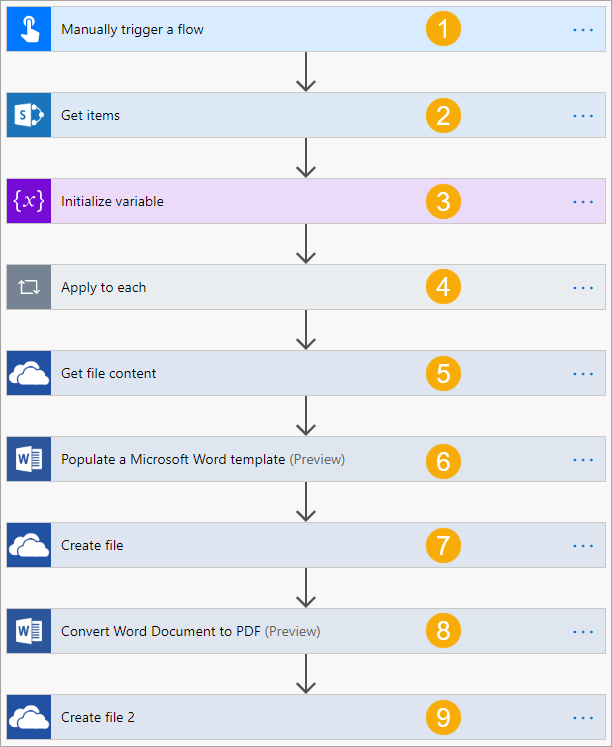
Now you can build the Flow to create the PDF file. The invoice line items for this example will come from a SharePoint list called InvoiceList.
1. Manually trigger a flow

This example will use the flow button with a text input for the invoice number as the trigger.
2. Get Items From SharePoint List
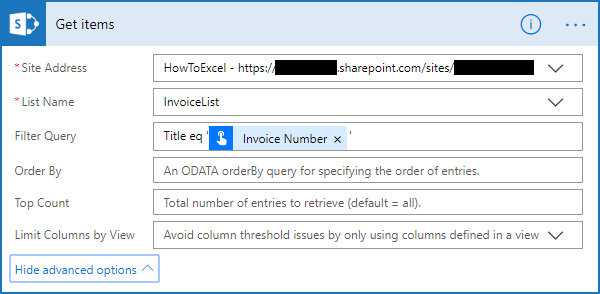
Now we need to get the relevant items from our SharePoint list with the Get items action.
You can add a Filter Query to limit the items based on the dynamic content for the invoice number from the trigger step. The invoice number in this example is in the Title column of the SharePoint list.
3. Initialize Variable For Invoice Items

Here you can initialize an Array variable to hold the SharePoint list items. The items will need to be in an array when populating the Word template later.
4. Append SharePoint Items To Array
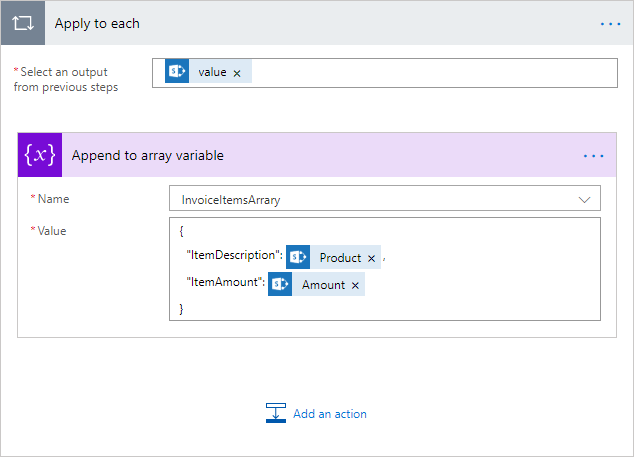
Now you can populate the array with all the data from the SharePoint list items.
Add an Apply to each action and add the value dynamic content from the Get items step. Then add an Append to array variable action inside.
The Value can then use the dynamic content for the fields from you need from your SharePoint list.
This will be used to populate the Word template.
5. Get File Content For The Signature Image

Add a Get file content action and connect it to the signature image to be used.
6. Populate A Microsoft Word Template
Add the Populate a Microsoft Word template action and connect it to your template saved in either SharePoint or OneDrive.
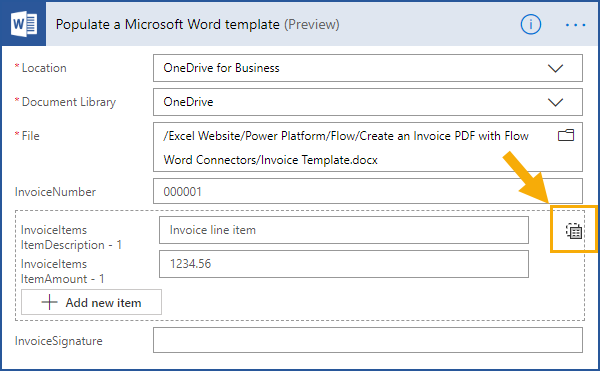
Since the invoice will have a varying number of invoice line items, you will need to Switch to input entire array mode.
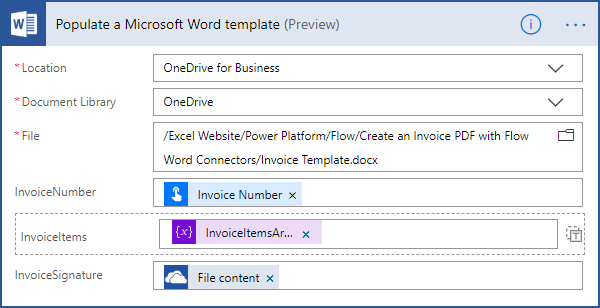
Then you can add dynamic content from the previous steps to populate the various invoice content controls.
7. Create File From Populated Word Template

Populating the Word template doesn’t create the file. You will need to add a Create file action.
Make sure to add the proper docx file extension to the File Name.
The File Content will be dynamic content from the previous Populate a Microsoft Word template step.
8. Convert Word Document To PDF

Now that you have a populated Word document, you can use the Convert Word Document to PDF action to convert the file to PDF.
The file to be converted won’t exist until the Flow runs, so you won’t be able to use the file picker to select the file. Instead, you’ll need to use the Path dynamic content from the previous Create file step.
9. Create PDF File

Again, converting the word document to PDF doesn’t create the file. You’ll need to add a Create file action.
Make sure to add the proper pdf file extension to the File Name.
The File Content will be dynamic content from the previous Convert Word Document to PDF step.
Conclusions
The new Word connectors are a great option to dynamically create PDF’s from Word templates.
But there are a few tricky bits in the process that aren’t quite obvious.
Once you get them figured out, you’ll be able to create some awesome PDF templates in Word and use Flow to dynamically populate them with your data.
